Find your way around
Open a few files, find the current branch, and get comfortable switching between tabs.
For now, leave Zide's layout as it is. A single pane is enough for every exercise in this guide. The screenshot labels the main areas; your tabs may be arranged differently.
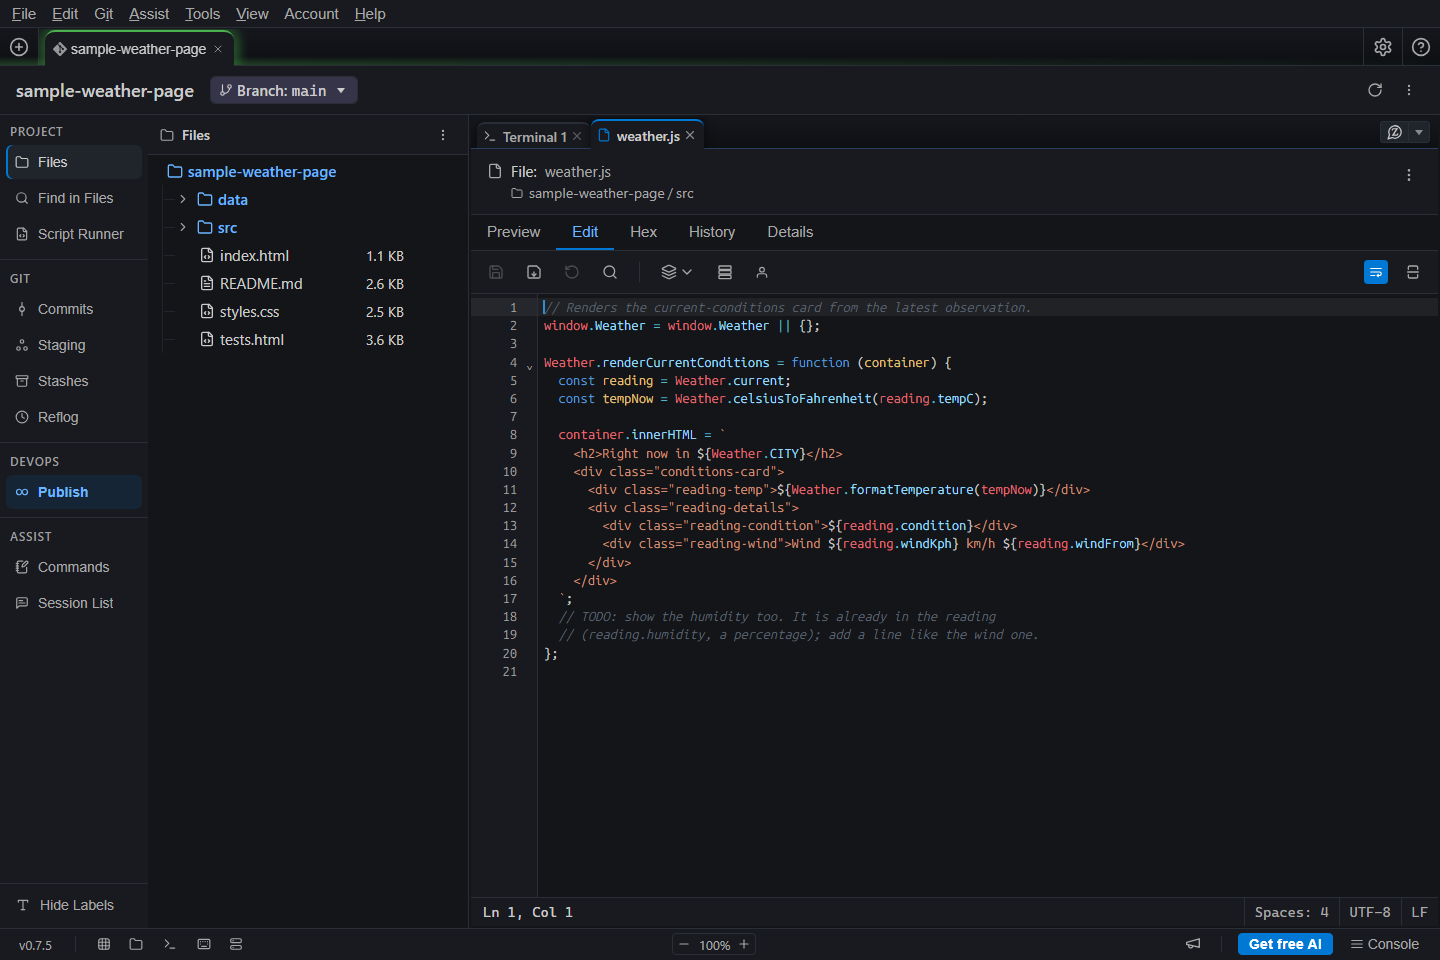
- 1. Project Tabs: across the top
- Each opened folder has its own workspace, including files, Git state, content tabs, and panes.
- 2. Activity bar: down the left
- Click an activity, such as Files, Commits, or Staging, to show its list. Clicking the selected activity again hides its panel. Hover over an icon to read its name.
- 3. Activity panel: beside the bar
- Browse the selected activity. Selecting an item opens its details in a content tab.
- 4. Content tabs: inside the project
- Each tab shows something you opened within the project, such as a file, commit, conversation, or terminal. Click a tab to return to it. These are separate from the Project Tabs across the top.
- 5. Branch control: in the project header
- A Git branch is a named line of development. This control shows your current branch and lets you browse branches, compare changes, switch branches, or create a branch or worktree.
Meet the Branch control
- Find Branch: main below the Project Tab bar. A branch is a named line of development; new commits go onto the branch you have checked out.
- Click the Branch control. Find main and the sample's experimental add-wind-chill branch. Use Search branches if needed.
- Leave main selected. Click outside the dropdown to close it. You do not need to switch branches yet.
The dropdown also offers New branch..., New worktree..., and links to the full Branches and Worktrees tabs. Switching branches changes the files in the current folder. A worktree gives a branch a separate folder and Project Tab. You will try creating one with QuickTree later.
In a worktree's Project Tab, this control is called Worktree. It shows the worktree's branch and provides actions for bringing changes together and finishing the worktree.
Open files and switch between them
- If the file list is not visible, click Files in the activity bar. In the file list, click README.md.
- Middle-click index.html in the file list by pressing your mouse's scroll wheel. It opens in another content tab. If your mouse or trackpad has no middle button, right-click the file and click Open in New Tab.
- Click the README.md and index.html tabs in turn. The selected tab's contents fill the pane.
- Click Commits in the activity bar and select a commit to inspect its details. Click Files to return to the file list.
- Click the selected activity again to hide its panel and give the content more room.
Optional: put two files side by side
If you would rather see both files at once, turn on the controls for custom panes first.
- Click View in the menu bar, then click Advanced Pane Controls. If it is already checked, leave it on.
- Drag the index.html content tab toward the right edge of the content area. Release it when the split preview appears.
- Click README.md in the other pane. You can now read the README beside the HTML file. Drag the divider between them to change their widths.
- To return to one pane, click View and click Single Pane Layout.
Switch projects without losing your place
Zide is designed for working on several projects at once in one window. Each project has its own Project Tab.
To open another project, click File in the menu bar, then click Open Project. Click Browse... and select another practice folder. After it opens, click the weather Project Tab at the top of the window. Its files and tabs are still there. You can skip this step if you only have the weather project open.
A terminal or AI session belongs to the project where you opened it. Before asking a tool to change files, check the selected Project Tab and its folder.
Before moving on
Return to the weather Project Tab and click its index.html content tab. The next chapter starts with an edit to this file.
More detail: Project tabs, Panes and layout, and the activity bar reference.